GA4 call tracking is how phone calls show up alongside form fills and purchases in your Google Analytics 4 reports. You have two options. Option A – natively with GA4 and Google Tag Manager: GTM fires a GA4 event every time someone taps a tel: link on your site. No third-party software, but you’re only measuring the click, not whether the call happened, how long it lasted, or how it ended. Option B – with call tracking software: the platform fires GA4 events on real, answered calls and lets you trigger different events for different outcomes (call connected, qualified, converted, missed). This is what gives you call source, GCLID-attributed campaigns, call duration, and a clean Smart Bidding signal in Google Ads. Use Option A when you don’t have a call tracking platform; use Option B for real attribution and bidding optimization.
Most articles about GA4 call tracking are click-here-click-there walkthroughs that skip the only question that actually matters: are you trying to measure tap-to-call intent, or are you trying to measure real calls with full attribution? The two require different stacks. This guide covers both honestly, then goes deeper on the layered conversion event model, Consent Mode v2, reporting beyond defaults, and how to send call conversions back to Google Ads so Smart Bidding can act on them.
If you don’t have a call tracking platform yet, follow Option A. It’s free and it works, but it’s a click, not a call. If you want real attribution, follow Option B. See Google Analytics capabilities in our product for what that looks like end-to-end.
How GA4 thinks about phone calls
GA4 is event-based. Everything is an event: page_view, scroll, file_download, purchase, your custom call_completed and every event has parameters attached to it. There are no UA-style sessions, no goals, no view-level filters. If you grew up on UA, the easiest way to think about GA4 is: the unit of measurement is the event, and reporting is the surface that aggregates events by whatever dimensions you tell it to.
For phone calls, this means one decision: what event name do you send, and what parameters do you attach? The convention most call tracking platforms (Nimbata included) settled on is:
- Event name: call_completed for a single primary event, or a layered set (covered later in this guide) for richer attribution.
- Required parameters: client_id (stitches the event to the right visitor session), page_location, source, medium, campaign, gclid, session_id, engagement_time_msec.
- Custom parameters: call duration, talk duration, call outcome, tracking number, AI-classified call category, value, and anything else your call tracking platform exposes.
GA4 doesn’t know your custom parameters exist until you explicitly register them as custom dimensions (text values like call outcome) or custom metrics (numeric values like call duration or revenue). Until you register them, GA4 ingests the parameters silently and discards them from reporting. This is the single biggest gotcha for newcomers “my events are firing but I don’t see the data.”
Two ways to track calls in GA4 – How to pick your stack
There are exactly two ways to get phone-call data into GA4. Anything else is a variation on one of these.
| Option A // Native (GA4 + GTM) | Option B // Call tracking software | |
|---|---|---|
| What you measure | Clicks on tel: links – taps on the phone number, especially on mobile | Real inbound calls – every answered call with duration, outcome, and attribution |
| Captures desktop calls | No – desktop visitors usually dial the number on their phone manually | Yes – the visitor doesn’t have to click anything; the call itself is the event |
| Captures call outcome | No – GTM doesn’t know if the call connected, was answered, or led to a sale | Yes – connected, qualified, converted, missed, voicemail, all available |
| Attribution depth | Page-level + UTMs from the URL. GCLID present only if Google Ads auto-tagging is on AND the visitor has consented to ad_storage | Same as Option A, plus session-persisted GCLID across the entire visit, plus AI-classified call outcome tied to the same visitor |
| Cost | Free | Subscription (Nimbata, CallRail, CTM, etc.) |
| Setup time | 30–60 minutes for GTM trigger + tag + variables | 10 minutes – paste two credentials, place a test call |
| Smart Bidding-grade signal | Weak – “a click on the phone link” is a noisy proxy | Strong – you can fire the bidding event only on qualified calls |
Use Option A as a starting point if you’re not ready to invest in call tracking software — it’s a real signal and better than nothing. Use Option B as soon as call quality matters for budget decisions. Many setups end up using both, with Option A as a tap-intent funnel signal and Option B as the source of truth for conversions.
Option A // Tracking calls natively in GA4 with GTM
This path uses only Google’s own tools – GA4 and Google Tag Manager. It costs nothing, but it measures clicks on tel: links, not real calls. On mobile, a tap on a tel: link usually dials the number; on desktop, it might open a soft-phone app or do nothing. Either way, GTM only sees the click – not what happened next.
Setup is all in GTM. Three configurations + a Phase 2 in GA4 that mirrors Option B.
Phase 1: Inside Google Tag Manager
Step 1 – Create a Click trigger for tel: links.
GTM → Triggers → New → Trigger type: Just Links. Configure:
- This trigger fires on: Some Link Clicks
- Fire on: Click URL starts with tel:
Save as something obvious like “Click – tel link.”
Step 2 – Create a GA4 Event tag.
GTM → Tags → New → Google Analytics: GA4 Event. Configure:
- Measurement ID: your G-XXXXXXXXXX
- Event name: phone_link_click
- Parameters (each as a row in the Event Parameters table):
phone_number = {{Click URL}}
page_location = {{Page URL}}
page_title = {{Page Title}}
device_category = {{Device Category}}
- Trigger: the Click trigger from Step 1.
Device Category requires a Built-In variable – enable it under Variables → Built-In Variables → Device Category in GTM.
Step 3 – Persist GCLID and UTMs across pages.
Google Ads auto-tagging puts GCLID in the URL the visitor lands on, and UTMs cover other sources. But by the time the visitor clicks the phone number on a different page, those parameters are gone from the URL – and your event will land as (direct)/(none) in GA4.
Fix: add a small DataLayer push on page load that reads ?gclid, ?gbraid, ?wbraid, ?utm_* from the landing URL and stores them in a cookie. Then create GTM User-Defined Variables that read those cookies, and reference them in the GA4 Event tag’s parameter list from Step 2. Skip this step and Option A is effectively useless for paid-traffic attribution.
Phase 2: Inside GA4
Step 4 – Register dimensions and decide on conversion status.
Same as Option B’s Phase 2 – register phone_number, page_location, device_category, and your GCLID/UTM parameters as event-scoped custom dimensions in GA4 Admin → Custom Definitions.
On whether to mark phone_link_click as a key event: don’t. A click on a phone link is not a conversion – it’s an engagement signal. Mark it as an engagement event in reports, and reserve key event status for events you can verify actually happened (which Option A can’t do).
What native tracking misses
Be honest with yourself about the gaps before you build a strategy on Option A:
- It doesn’t see desktop callers who type the number manually.
- It doesn’t see callers who tap a Google Business Profile listing or a Google Ads call extension.
- It doesn’t know if the click resulted in a connected call, a wrong number, a hangup, voicemail, or a 20-minute qualified conversation.
- It can’t fire different events for different outcomes – every click is the same event.
- It’s a weak Smart Bidding signal – Google Ads will optimize toward “more tel: clicks,” not “more revenue calls.”
These aren’t reasons to skip Option A. They’re reasons to add Option B when you’re ready.
Option B – Tracking real calls with call tracking software
Call tracking software measures the actual call: who called, from where, when, for how long, and what happened. The mechanic is a unique tracking phone number swapped in via Dynamic Number Insertion (DNI) – the visitor sees a number tied to their session, calls it, and the platform attributes the call back to the visit, the campaign, and the original ad click. The platform then sends the call event into GA4 via the Measurement Protocol with the full attribution payload.
Setup splits cleanly into two phases. Phase 1 is inside Nimbata: connect to GA4, choose which call events to send, activate the workflow. Phase 2 is inside GA4: verify the events are arriving, register their parameters as custom dimensions, and mark the right ones as key events. Phase 1 is fast – usually under 5 minutes. Phase 2 is where setups go wrong, so do it carefully.
Phase 1: Inside Nimbata
Before you start: the integration is configured at the project level. Make sure you’re editing the right project before you paste credentials.
Step 1 – Grab your GA4 credentials.
In GA4, go to Admin → Data collection and modification → Data Streams → [your web stream] → Web Stream Details. You need two values from this page:
- Measurement ID (format: G-XXXXXXXXXX) – listed under Stream Details.
- Measurement Protocol API secret – under Events → Measurement Protocol API secrets. Generate one if you don’t have it yet. Treat the secret as a credential; it has write access to your property.
Step 2 – Connect Nimbata to GA4.
In Nimbata: Integrations → Google Analytics. Paste the Measurement ID and API secret. Save.
Step 3 – Select the call events to send.
This is where the layered conversion model from earlier in this guide becomes a real implementation step. Nimbata lets you send multiple call events to GA4 from the same integration – not one event with conditions, but distinct event names, each with their own parameters.
Click on the tab and configure each event:

- Event name: a distinct name per row. Use the layered model – e.g., call_completed, call_connected (Answered Calls), call_qualified (long-duration or AI-tagged), call_high_value (revenue threshold met), first_time_caller. Distinct names prevent overlapping data in GA4.
- Event parameters: optionally attach extra parameters per event (Start Time, Campaign, Recording Link, Call Outcome, Tracking Number, etc.) by selecting them and assigning a name. These become event parameters in GA4 – and need to be registered in Phase 2 before they show in reports.
Most production setups fire 3–4 events: a baseline (all calls), an answered/qualified event (the bidding signal), and an outcome-specific event or two. The Smart Bidding optimization in Google Ads ends up pointing at the qualified row.
Then create a simple workflow to set the firing condition for each event:
- Trigger condition: which calls fire this event – All Calls, Answered Calls, First-time Callers, calls meeting a duration threshold, or custom criteria configured in Nimbata workflows.
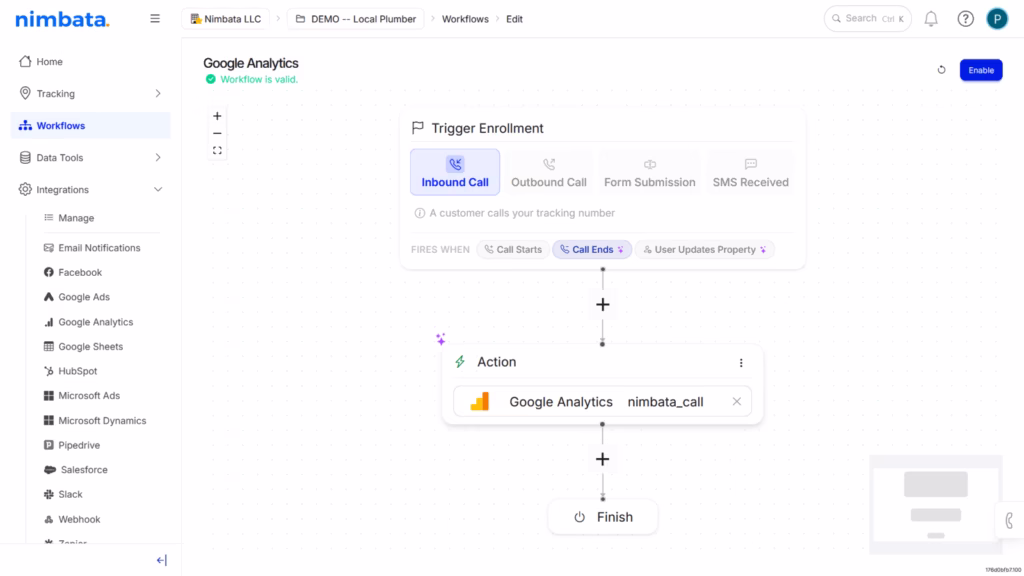
Step 4 – Activate the integration.
Once credentials are saved and events are configured, Nimbata prompts you to create a workflow. Click Create new workflow – Nimbata wires up the automation for you. No GTM, no Zapier, no manual scripting.
Return to the Google Analytics integration page. You should see:
This integration is running in 1 workflow: Google Analytics (running)
That status confirms Phase 1 is done. Place a test call now – it’ll arrive in GA4.
Phase 2: Inside GA4
Step 5 – Verify in DebugView.
GA4 → Admin → DebugView. Place a test call. Within minutes you should see your call event (or all the call events you configured in Step 3) with their parameters populated. If a parameter is empty in DebugView, it’ll be empty in your reports – fix it before moving on, either by adjusting the Nimbata event configuration or by checking the parameter is actually being captured by Nimbata in the first place.
Step 6 – Register parameters as custom dimensions and metrics.
Until you register a parameter, GA4 won’t expose it anywhere – not in reports, not in Explorations, not in audiences, not in Looker Studio. Admin → Custom definitions → Custom dimensions / Custom metrics → Create. For each parameter you’ll filter or aggregate on:
- Dimensions (text, low-cardinality): tracking number name, call outcome, call disposition, source channel, brand name, campaign, GCLID, country.
- Metrics (numeric): call duration, talk duration, call value, engagement_time_msec.
- Scope: Event for almost everything; User scope only for sticky per-visitor properties like “is repeat caller.”
GA4 limits standard properties to 50 event-scoped dimensions and 50 metrics. Register what you’ll actually use, not every parameter Nimbata sends.
Step 7 – Mark your event(s) as key events.
GA4 renamed conversions to “key events” in early 2024 – same mechanic. Admin → Events → toggle the events you want counted as conversions. Per the layered model: typically mark call_qualified (and optionally call_converted, call_high_value) as key events. Leave call_completed, call_missed, and call_voicemail unmarked – they’re useful as engagement events but they’re not conversions.
Once marked, the event appears in conversion reports, becomes importable into Google Ads as a conversion action, and shows as a conversion metric in Looker Studio.
Optional: server-side call tracking for even better attribution
The setup above is the standard call tracking-software path and it works for most teams. If you’re running a privacy-sensitive setup, dealing with aggressive ad-blockers or ITP, or just want the cleanest possible attribution signal, there’s a stronger option layered on top: Read our complete Server-side Call Tracking guide.
Server-side call tracking moves the visitor-identification and event-firing logic out of the browser and onto your own server (or your CDP / server-side Google Tag Manager container). The benefits: GCLID and UTM capture survive ad-blockers and Safari ITP, consent state can be enforced consistently before any data is sent, and the GA4 event payload is built in a controlled environment instead of a noisy browser. It’s not required for Option B to work – but if call attribution accuracy materially affects budget decisions, it’s worth the extra setup.
The layered conversion event model — one call, multiple GA4 events
Most GA4 call tracking setups fire a single event (call_completed) on every call. That’s fine as a baseline, but it conflates four very different things: a call that rang and was missed, a call that was answered and immediately hung up, a call that lasted two minutes but didn’t qualify, and a call that closed into revenue. Each of those is a different signal for a different team. Each deserves its own event.
Here’s the layered model most expert call-attribution setups end up with:
| Event name | What it represents | Key event in GA4? | Use as optimization signal? |
|---|---|---|---|
| call_completed | Any call that reached your number (baseline catch-all) | Optional | No – too noisy |
| call_connected | Call was answered by a human (not voicemail, not missed) | Yes | Sometimes – for high-volume B2C |
| call_qualified | Call lasted long enough or matched criteria (e.g., >60s OR AI-tagged “sales inquiry”) | Yes – recommended primary | Yes – recommended primary |
| call_converted | AI marked the call’s lead as won or appointment booked | Yes | Yes – for revenue-optimized accounts |
| call_missed | Phone rang but no one answered, or hung up before answer | No (diagnostic only) | No |
| call_voicemail | Caller left a voicemail | No (diagnostic) | No |
| call_high_value | Estimated call value > threshold (revenue model) | Yes (optional) | Yes – for revenue-based optimization |
Why this matters when you import call conversions from GA4 to Google Ads
If your Google Ads bidding signal is call_completed, Smart Bidding optimizes for the broadest event – “a phone call happened.” It will happily drive wrong-number calls, hangups, and voicemails because they all count. Conversion volume goes up; revenue often doesn’t.
If your bidding signal is call_qualified, Smart Bidding optimizes for the call shape that actually closes. It learns which campaigns, keywords, and audiences produce real conversations and shifts spend toward them. The same dollar produces fewer total calls but more qualified ones – and CPA on revenue (not on raw calls) drops by 20–40% in most accounts that make this switch.
If your bidding signal is call_converted (CRM-marked won), you’re handing Smart Bidding a near-perfect revenue proxy. The tradeoff is volume – the conversion event is slow (it depends on your sales cycle) and rare (most calls don’t close), so Smart Bidding’s learning phase is longer. For accounts with enough call volume (~30+ won deals per month from calls) this is the best signal you can give it.
How call tracking software decides which event to fire
The trigger logic varies by platform. In Nimbata, you can fire any combination of the above based on:
- Call duration thresholds. e.g., >30s = call_qualified, >300s = call_high_value.
- AI-classified call outcome. Nimbata’s conversation analysis can tag a call as “sales inquiry,” “support,” “wrong number,” “competitor mention,” or any custom category. Fire call_qualified only on the categories that matter.
- IVR digit press. If you have an IVR menu, the digit pressed tells you intent. Caller pressed 2 for sales = call_qualified; pressed 1 for support = different event.
- Tracking number / source-based rules. Calls to certain campaign numbers can fire different events automatically.
- CRM webhook. When the CRM marks the call’s lead as won, fire call_converted. This is the only way to get true revenue attribution.
Multiple events from one call – won’t they double-count in GA4?
They count as separate events, which is what you want. A single call can be call_completed + call_connected + call_qualified + call_converted – each is a different row in GA4’s events table. In Google Ads, only one event should be your primary conversion action (typically call_qualified); the others can be imported as “secondary” conversions that show up in reports but don’t drive bidding.
If you don’t want the parent event to count once a deeper event fires, fire only the deepest event and skip the upstream ones. Most teams find the layered approach more useful – it lets sales and marketing both report on the metric that matters to them, from the same data.
Reporting – beyond default reports
Default reports
After custom dimensions are registered, build standard reports for:
- Calls by source/medium (Acquisition → Traffic acquisition, with the call event as the secondary metric)
- Calls by campaign / GCLID (Advertising → All channels)
- Calls by landing page (Engagement → Landing page, filtered by event name)
- Call duration distribution (Explorations → Free form, with call_duration as the metric)
Explorations – for the analyses default reports can’t do
Three reports to build first:
- Funnel exploration: page_view → phone_link_click (Option A) → call_qualified (Option B). Reveals tap-to-call dropoff and the visitor pages that drive each step.
- Path exploration: starting node call_qualified, going backward. Shows what visitors did in the 30 minutes before they called – usually surfaces 1–3 pages you didn’t know were call drivers.
- User explorer: filter to users with a call event. Drill into individual sessions to debug attribution edge cases.
Looker Studio dashboards
Three dashboards worth building for any agency or marketing lead:
- Calls vs. forms by channel – side-by-side conversion comparison.
- Call attribution waterfall – calls broken down by GCLID-attributed, UTM-attributed, organic, and (direct). The (direct) bucket is your improvement opportunity.
- Call quality by source – qualified-call rate and average call value per source/campaign. This is the dashboard that justifies budget shifts.
BigQuery export for the long-cycle questions
GA4 standard properties can stream raw event data to BigQuery for free, up to 1 million events/day. This is where you handle questions standard reports can’t: multi-month attribution, cross-property joins, joining call data to CRM revenue, custom funnels longer than GA4’s UI allows. Enable it under Admin → BigQuery Links. As a no-code alternative for smaller teams, you can also send visitor-level call data to Google Sheets and pivot from there.
Sending GA4 call conversions back to Google Ads for Smart Bidding
GA4 is your reporting layer. Google Ads is where bidding decisions happen. If your call event lives only in GA4, Smart Bidding doesn’t know about it.
Two ways to connect them:
- Import the GA4 key event into Google Ads. Tools → Conversions → New conversion action → Import → Google Analytics 4 properties. Pick your call event (typically call_qualified). Google Ads now optimizes bidding toward it. Caveat: GA4 imports are click-modeled – they credit the GCLID that brought the visitor in. Works, but it’s a step removed from the source. Step-by-step: How to import Nimbata call events into Google Ads via GA4.
- Send call conversions directly from the call tracking platform to Google Ads. Skip GA4 as the middleman for the bidding signal. Nimbata pushes a Google Ads conversion with the captured GCLID at the moment the call qualifies (or converts), with the call value attached. Smart Bidding sees a conversion event with revenue, not just a count. See Nimbata’s Google Ads integration and the deeper dive in GCLID tracking for Google Ads.
Best practice is to use both. GA4 import gets you reporting consistency; direct Google Ads conversion firing gets you the cleanest bidding signal. Pick one as the primary conversion action in Google Ads and tag the other as secondary so it appears in reports but doesn’t drive bid optimization.
Attribution models — what GA4 actually credits a call to
As of 2024, GA4’s default attribution model for conversions is data-driven attribution (DDA). For call events:
- DDA spreads credit across all clicks/sessions in the conversion path, weighted by their contribution. A visitor who clicked a brand-search ad, then organic-searched a week later, then converted by phone, gets credit split between the two channels.
- Last-click is still the default for ad-platform reporting (Google Ads, Meta), which is why GA4 and Google Ads sometimes disagree on which campaign drove a call.
- Go to Advertising → Attribution → Model comparison to see the gap between DDA and last-click. Usually 15–30% – that’s how much credit your prospecting campaigns deserve that last-click is hiding.
Cross-device measurement is largely modeled in 2026 – Google Signals adds device-graph linking when users are signed into a Google account, but the underlying signal is sparser than pre-iOS-14. For phone calls, the cross-device path that matters most is: ad click on mobile, call from the same phone moments later. Option B captures this natively because the call tracker reads the GCLID from the session and ties the call back.
Common mistakes – the technical failure modes
- Skipping the test call. GA4 won’t expose an event in dropdowns for key event marking, custom dimensions, or audiences until it has actually received at least one instance. Always fire a test right after setup.
- Wrong measurement ID or API secret. The Measurement Protocol returns 204 No Content on a malformed request – the API call “succeeds” silently and your event vanishes. Verify in DebugView, not just by reading the response code.
- Forgetting to register parameters as custom dimensions/metrics. The most common reason “my data isn’t showing up” – events are firing fine, GA4 just isn’t exposing the parameters anywhere.
- Not marking the event as a key event. Without this toggle, the event is invisible in conversion reports, can’t be imported to Google Ads, and doesn’t get conversion-style aggregation in Looker Studio.
- Missing UTMs on offline-source URLs. Vanity URLs printed on radio ads, billboards, or QR codes – without UTMs, GA4 has nothing to attribute the eventual call to.
- Wrong session_id stitching. If your call tracker sends a session_id that doesn’t match GA4’s session model (timestamp-based, resets on 30-min inactivity), the event lands as a new session and attribution breaks. Use client_id as the primary stitch parameter, session_id as secondary.
- Timezone drift. GA4 reports in the property’s timezone; call tracking platforms often send UTC. A call timestamped 11pm UTC may appear as a different-day conversion in local reporting. Confirm timezones match.
- Data sampling on Explorations. Explorations sample data above 10M events. On large properties with sparse call data, your call analysis can be sampled out. Use the unsampled “compare to standard report” check.
- Data thresholding hiding small segments. GA4 applies a privacy threshold that hides data for small cells (typically <10 users). On low-volume call channels, entire dimensions can disappear. Workaround: widen the date range or aggregate to a coarser dimension.
- Realtime report misleading you during setup. Realtime is live data; standard reports are processed batches. Don’t troubleshoot using standard reports the same day.
- Ignoring data retention. GA4 defaults to 2 months of user-level data retention for event-scoped custom dimensions. Set it to 14 months under Admin → Data Settings → Data Retention if you need quarter-over-quarter comparisons.
Consent Mode misconfigured. Basic Consent Mode drops events on denied consent entirely. Advanced sends cookieless pings for modeled conversions. The wrong setting silently cuts EU conversion volume by 30–60%.
Putting GA4 call data to work
Reports aren’t the goal; decisions are. Five things to do once data flows cleanly:
- Reallocate budget toward high-call-quality sources. Pull “calls by source” with average call duration and qualified-rate as secondary metrics. High-volume, short-duration sources are usually misdirected traffic – pause or reframe.
- Build call-driver audiences for remarketing. Admin → Audiences: create an audience of users who fired call_qualified. Sync to Google Ads and Meta as a lookalike seed or exclusion list.
- Hand call data to Smart Bidding. Import call_qualified as the bidding conversion. Run for two Smart Bidding learning cycles (4 weeks) and compare CPA against the pre-import baseline.
- Find your hidden call drivers. Path exploration backward from call_qualified surfaces pages you didn’t know were call drivers — usually FAQ and pricing pages. Add prominent call CTAs to them.
- Replace anecdote with data in sales reviews. Sales teams say things like “our best leads come from referrals.” Show them the attribution waterfall.
Prefer a video walk-through?
Here’s a detailed video tutorial showing how to set everything up and where to find your credentials.
FAQ – Top 10 Questions and answers
Events in GA4 typically show up after a couple of minutes but may take up to 36 hours to show.
Two options. Native (GA4 + Google Tag Manager): fire a GA4 event when someone clicks a tel: link on your site. Free, but only measures clicks, not actual calls. With call tracking software: the platform measures real answered calls and fires GA4 events with full attribution and call outcome. Most professional setups use option two for real attribution and Smart Bidding optimization.
Yes – using Option A in this guide. GTM fires a GA4 event on every click of a tel: link. You’ll see how many people tapped the phone number, broken down by source. You won’t see whether the call actually happened, how long it lasted, or how it ended.
phone_link_click is fired when someone taps the phone number on your website – a click event. call_completed (or whatever name your call-tracking platform uses) is fired after a real inbound phone call to your tracking number, with the actual call data attached. The click is intent; the call is the conversion.
Click on Engagement – Conversions and locate the call conversion. Click on the conversion and set source or medium as the filter in the column.
Google Analytics 4 Call Tracking includes the ability to see which campaigns generated calls. Click on Engagement – Conversions and locate the call conversion. Click on the conversion and set campaign as the filter in the column.
GA4 changes the way data is collected and reorients the metrics from sessions to events. Even though we send the GA client id, session id, source, medium and campaign Google may not match these in some cases. We recommend creating custom definitions as per above or use the method outlined in the answers above.
Yes! You will need to create a custom metric first so Nimbata can pass this value along with the event. Check the guide above in the section “Custom Metrics” on how to do so.
Nimbata sends the following data in GA4 (in bold are the parameters that are always sent by default):
client_id
page_location
source
medium
campaign
gclid
dclid
device
country
ua
session_id
engagement_time_msec
Unique Call ID
Start Time
Tracking Number
Tracking Number Friendly Name
Destination Number
Destination Number Friendly Name
Configured Tracking Source
Call Duration
Talk Duration
Call Outcome
Call Disposition
Call Frequency
Brand Name
Digits Pressed by Caller
Digits Pressed by Destination
Tags
Value
Trigger Name
+ any custom property you create in Nimbata!
To be able to view call information in GA4 you need to setup custom dimensions and / or custom metrics. When you create a custom dimension or metric GA4 populates this with whatever value it collects from the corresponding event parameter or user property.
Creating custom dimensions and metrics allows you to easily access and use your event properties and user properties. For example, without creating a custom dimension for your Tracking Number Name event parameter, you won’t be able to see the tracking number name in GA4 reports or use it in audiences.
Takeaway
Native GA4 + GTM tracks tel: link clicks. That’s what Google’s tools alone can see. It’s a useful funnel signal – especially on mobile-heavy sites – and it costs nothing. But it’s a click, not a call. It doesn’t know whether the call connected, how long it lasted, whether it qualified, or whether it closed.
Call tracking software lifts the ceiling on what GA4 can measure. You get real calls with full attribution, layered conversion events tied to what happened during the call, and a Smart Bidding signal that optimizes for revenue calls instead of raw call counts. Both paths exist for a reason – start with native if you’re not ready for software, add software when call quality starts driving budget decisions.